Spindelnatto
Fourth Exercise – Spindelnatto
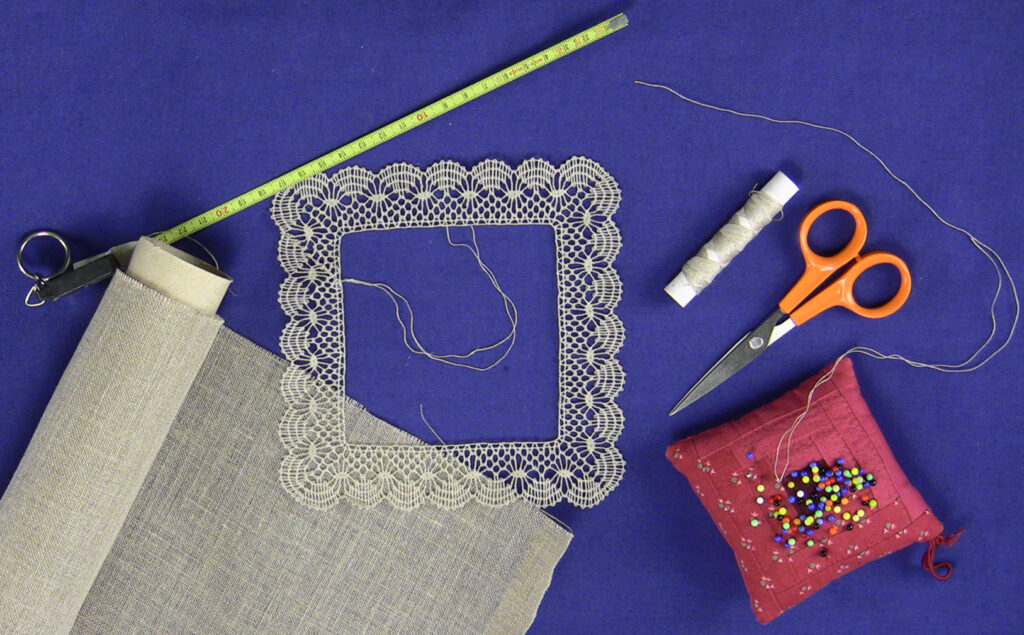
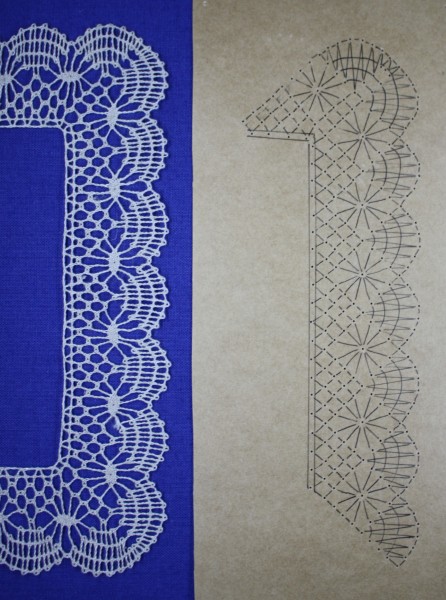
The result of this exercise is a small cloth. In spindlenatto, we repeat what we have learnt so far, i.e. the full stitch base, the border with three bobbin pairs and the spider. New are the start, bundle, additional twists, corners and joining the ends. Make this exercise also with Bockens 60/2 linen thread. You will need 12 pairs or 24 bobbins. Wind the threads on the bobbins, you will need about 5 metres of thread for one pair of bobbins. The finished cloth measures approximately 16 x 16 cm. Prepare the mynsteri according to the instructions in the course material.

Beginning the Spindelnatto
These instructions are translated from the video below, so follow along to the visual guide to get the best results.
Put two pairs onto the first pin. Put the pairs into the starting position by making a twist onto them. Make a full stitch. Make a twist on both pairs. The left pair is the working pair in this bundle, and the working pair moves along the lines from side to side. Put the next pin into the left side of the bundle. Add a pair onto the new pin. Put the pair in the starting position. Make a full stitch with the new pair and the working pair. Lift the pin and place back between the pairs in the same hole. Make a full stitch. Now the working pair is the second pair from the left. Make a twist onto the working pair. Continue by making a full stitch with the working pair and the edge pair. Put in a pin. Make a full stitch and tighten. Make a twist onto both pairs. Make a full stitch with the working pair and the pair on the left. Add a twist to the working pair.
Add a pin and a new pair to the left side of the bundle. Put the pair into th estarting position. Continue the way you did in the last similar instance. Make a full stitch. Lift the pin and place back between the pairs in the same hole. Make a full stitch. Follow the pattern of the working pair. Remember to always add a twist to the working pair. Add a pin and a new pair on the left side of the bundel until the halfway point of the pattern. You are at the halfway point when you have six pairs on the work and you are on the left hand side of the pattern. Remember to tighten the pairs when putting in the pin. After the halfway point leave out one pair on the left side after every pin. On the last pin there should be two pairs left.
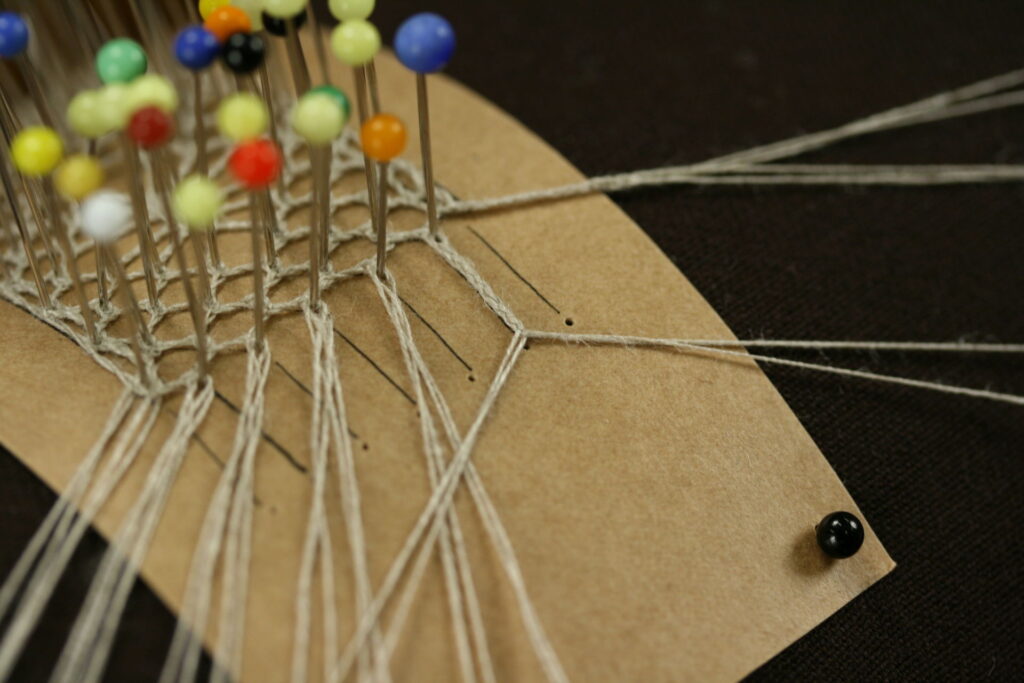
Up next, beginning the left edg of the spider and making the spider. Put in four new pins and pairs for the full stitich base. The palvements of the new pairs are shown in the picture. Make a twist on all four new pairs. Take the leftmmost pair from the bundle and the new pair next to it. Make a full stitch. Lift the needle and place it back between the pairs into the same hole. Make a full stitch. Take the pair on the left and a new pair on its left side. Make a full stitch. Lift the needle and place it back between the two pairs into the same hole. Make a full stitch. Do the same with the other two new pairs.
The work now has 10 pairs. Put in a new pin and a pair for the inner border. Make a full stitch with the leftmost pairs. Lift the pin and place it back between the two pairs into the same hole. Place the last new pair on the leftmost needle between the last two pairs. Make a twist on the two leftmost pairs. Make a full stitch. make a twist on both pairs. Make a full stitch with the second and third pair from the left. Now the spindelnatto has all the necessary pairs.
Making the Inside Border
These instructions are translated from the video below, so follow along to the visual guide to get the best results.
Next we will make the full stroke base on the left side, as well as the inner broder with three pairs. Take the fourth pair from the left and the leftmost leg of the spider. Make a full stitch. Place a pin. Make a full stitch. All of the spider legs on the left side are attached the same way with full stitches. Remember to tighten the legs. Move diagonally from the spider to the inner corner of the work using the full stitch base. Every pin of the full stitch base is meade by doing: whole stitch, pin, whole stitch.
Continue by making the inner border of the work with the three leftmost pairs. Make a whole stitch wit the second and third pair from thne left. Put in a pin. Make a twist on the left pair. Make a full stitch with the leftmost pairs. Make a twist on both pairs. make a full stitch with the second and third pairs from the left. Work the next two rows in the same way from leg to edge. Now thw three legs od the spider are attached t o the full stitch base. The last row of the full stitch base is left unfinished at this point. The leftmost pair at the bottom and the three legs on the left are left for the bundle.
The beginning is now ready. Begin making the bundle. Take the second pair from the right and the rightmost foot of the spider. Make a full stitch. Pin. Full stitch. Make a twist on the working pair. Take the rightmost pair and the pair on the edge. Full stitch. Pin. Full stitch. Make a twist on both pairs. Follow the drawn on lines with the working pair the same way you did in the first bundle. Continue making the bundle and bring the legs in one by one. Finish the bundle. Make the last row of the full stitch base. Begin the row by making a full stitch with the left pair of the bundle and the pair coming from the full stitch base . Continue making the pattern by alternating between the spider, full stitch base, bundle and the last row of the full stitch base.
Turning the Corner
These instructions are translated from the video below, so follow along to the visual guide to get the best results.
Move the bobbins towards the pins, so that the threads stay loose. If you are using a towel, fold it over your bobbins and fasten with pins. Remove the pins from the work one by one. remove the lace from the roller carefully. Spin the roller back, so that you are at the begining of the mynsteri. Set the part of the lace horizontally at the edge of the mynsteri. Attach the lace with pins to all the holes that are already in the lace. Clear places to put in the pins are for example the edges, spaces between the bundle, the edge of the full stitch base and the edge pf the bundle. Make sure you put pins into all the holes, so that the lace will retain its shape as you continue. When all the pins are in, bring the towel back down. If you used ladders or holders, remove them.
The last pin of the bundle is usually in the wrong place, which is why you should unravel the last full stitch. Lift the pin up and place it in the same hole. Make the full stitch again. Continue the lace by making the bundle. The bundle is made the same way it has previously. When the bundle is ready, tighten the threads, so that they follo the lines on the mynsteri. Next, make the full stitches at the top left corner of the spider. Make a twist on the pair coming from the corner, and make a full stitch. Pin. Full stitch. Repeat until you are left with two pairs. Make the inner corner with three pairs as usual. Continue normally until the end of the mynsteri. Make sure all sides are equally long, so that each side has six spiders. When you have turned the fourth side, make one more bundle, spider and full stitch base. The other half of the spider’s legs will be attached when the ends of the lace are attached.
Rauma Lace
Finishing Touches
- joining the ends of the lace with Impi’s knot
- fastening off broken and extended threads with Impi’s knot
- attaching the lace to fabric
- ironing the finished lace