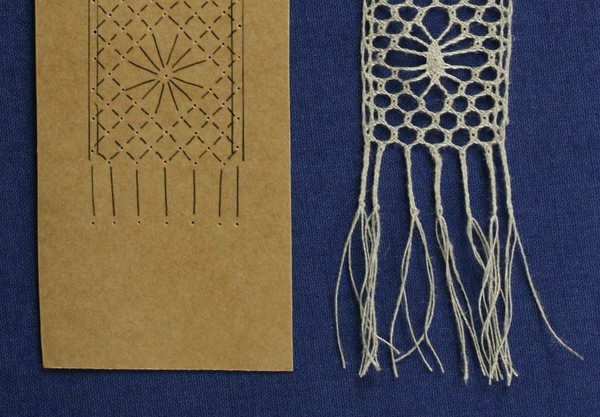
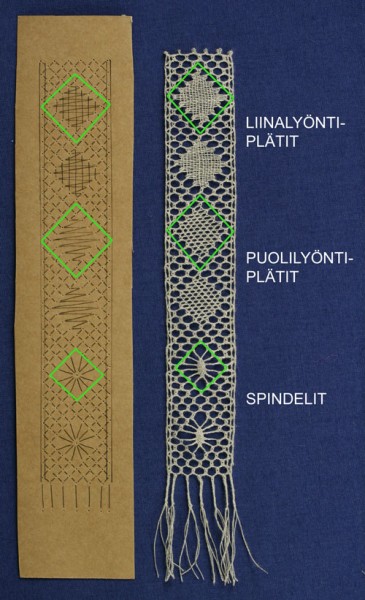
Diamond-Shaped Lace Patterns
Third Exercise – Diamond-Shaped Lace Patterns
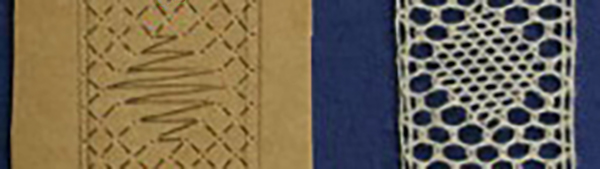
In this exercise, you revise everything you have learnt so far, i.e. the full stitch base, the linen stitch, the half stitch and the border with three pairs. The border with three pairs has been practised in the narrow lace with six pairs. New are the diamond-shaped patterns, or plätit in Finnish, and the spindle also known as the spider. The plaits are made to finish off the work.
Make this exercise with Bockens 60/2 linen thread. You will need 14 pairs, i.e. 28 bobbins. Wind the threads on the bobbins, you will need about two and a half metres of thread for one pair of bobbins. Prepare the mynsteri according to the instructions in the course material.
Full Stitch Base Instructions
These instructions are translated from the video above, so follow along to the visual guide to get the best results.
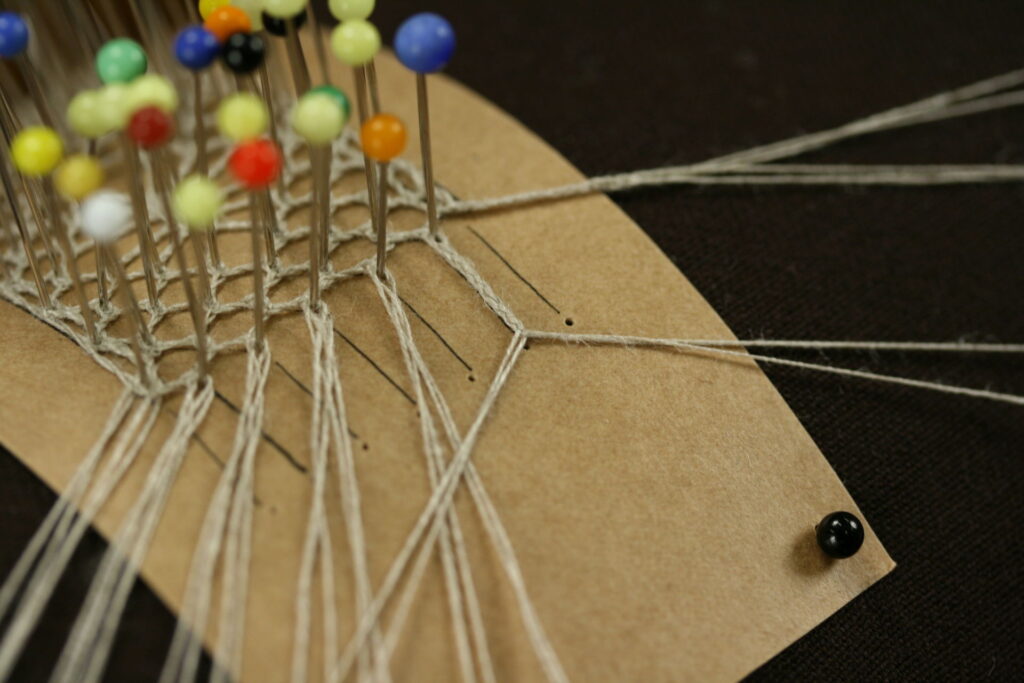
Put a pin in each hole of the first row of the mynsteri. The numbers indicate how many pairs are on one needle. Put on each pin as many pairs as indicated in the video, all together 14 pairs. Place all of the pairs in the staring position by making a twist.
Start making the full stitch base from the right side. Make a full stitch with the two outermost pairs. Leave aside the rightmost pair. Make a full stitch with the next two pairs. Moving on to the second pin from the right. Make a full stitch with the two pairs on the second pin. Tighten. Make a full stitch with the right pair of the second needle and the left pair of the first needle. Tighten. Put a pin in between the pairs. Make a full stitch. Tighten.
Do the edge of the lace as you would with the narrow lace with six pairs. Use the right side pair of the last pin and the pair to its right to make a full stitch. Put a pin in between the pairs. Make a full stitch with the two outermost pairs. Leave aside the rightmost pair. Secure the needle with a full stitch with the next two pairs.
Continue from the third needle from the top. Proceed diagonally towards the right. Keep making the lace as you did with the first two pins. Keep going until you have in use nine bobbin pairs. Make the other edge mirroring the right hand side, but move diagonally towards the left. For a more detailed visual on the making of the left side, look at the instructional video on the diamond-shaped linen stitch.
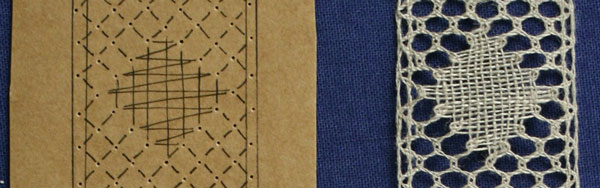
Diamond-Shaped Linen Stitch Pattern Instructions
These instructions are translated from the video below, so follow along to the visual guide to get the best results. Follow the previous instructions to make the full stitch base before the pattern.
Make a linen stitch with the two middle pairs. Put a pin in between the pairs. Make a linen stitch with the same two pairs. The pair on the left is the worker pair, meaning they work their way through all the pairs to the end of the pattern. The worker pair follows the lines drawn on the mynsteri from side to side. Make a linen stitch with the worker pair and the pair on the left side. Put in a pin. Make a linen stitch and tighten. Follow the line. Make the necessary linen stitches and bring in a new pair from the corner. Make a linen stitch. Put in a pin. Make a linen stitch and tighten. Continue in te same way until the middle of the pattern, at which point you should have nine pairs and the worker pair.
After the halfway point, leave out one pair at the corner pins. At the end of the pattern you will have two pairs on the last needle. Add a twist to all the pairs coming off of the diamond-shaped linen stitch pattern. Next, continue the full stitch base on both sides. Move diagonally. Make the second diamond the same way you did the first.
Diamond-Shaped Half Stitch Pattern Instructions
These instructions are translated from the video below, so follow along to the visual guide to get the best results. Follow the full stitch base instructions to make the full stitch base before the pattern. This pattern will not need to be tightened manually, since the set of strokes in the pattern will do that automatically.
Make a full stitch with the two middle pairs. Put in a pin and make a half stitch with the same two pairs. Take the left pair of the half stitch and a new pair from the left. Make a full stitch. Put in a pin. Make a half stitch. The half stitch will tighten at the edge of the pattern. Follw the drawn lines on the mynsteri. Make the necessary half stitches. Bring in a new pair from the sides. Make a full stitch. Put in a pin. Make a half stitch. Continue making half stitches from side to side. In this half stitch pattern you need to always make a full stitch on the outer corners and half stitches on the inside.
On the lefthand side in the middle of the pattern, bring in the last pair coming into the pattern and make a full stitch. Put in a pin and make a full stitch, meaning that the one pair brought in is left out immediately. Continue along to the right side of the pattern with half stitches. Do the same on the other end of the pattern; take in and leave a pair at the end of the row with full stitches. After the halfway point, a pair is always left out at the pin at the end of the row. Make a half stitch. Insert a pin. Make a full stitch. Continue until the end of the pattern. At the end you should have two pairs left. Next, continue the full stitch base on both sides the same way as with the end of the linen stitch pattern. Move diagonally. Make the second diamond the same way you did the first.
Spider
These instructions are translated from the video below, so follow along to the visual guide to get the best results. Follow the full stitch base instructions to make the full stitch base before the pattern.
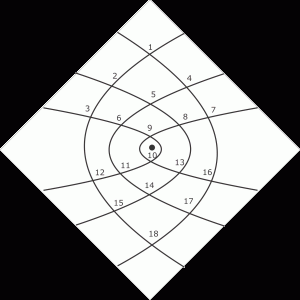
Make the spider with the six middle pairs using linen stitches. Add three twists to each pair, the pairs already have one twist due to being in the starting position. The three pairs on the right pass through the pairs on the left with linen stitches. *Start with the pairs in the middle by making a linen stitch. One by one, make a linen stitch with the next two pairs on the left. Now the right side pair of the first linen stitch is in the leftmost corner. Take the second pair from the right and one by one, make make a linen stitch with the next three pairs on the left. Take the remainin pair on the right side and one by one, make make a linen stitch with the next three pairs on the left.*
The spider is now halfway done. Lightly tighten. Put in a pin. Tighten. Hold the middle left pair and tighten the pairs on the right side. Do the same on the other side. Repeat the steps from the paragraph above *_*. Tighten. Next, add four twists to each pair, since after the linen stitches the pairs are not in the starting position. Tighten. Continue by making the full stitch base on the right side. Move dialgonally. The legs of the spider attach to the sides with full stitches (full stitch, pin, full stitch). Then make the full stitch base on the right side. Move dialgonally. Make the second spider the same way you did the first. End the exercise with plaits.
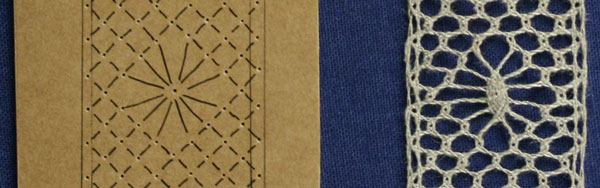
Make the centre of the spider with linen stitches in the order of the numbers shown in the picture.
Ending the Exercise
End the exercise by making the plaits at the bottom of the work.